Local printer is not detected when using Remote Desktop
Let’s face it, the RDP isn’t as terrible as it once was with printing. Having said that, there are still instances when putting the checkmark next to the printer won’t work. Update both computers to the latest Windows 10 as a start.
If you logged in correctly into the remote machine and can’t see your local printer as an option than follow these steps. You may not be required to perform all these steps. Try after each one and see if the problem is fixed.
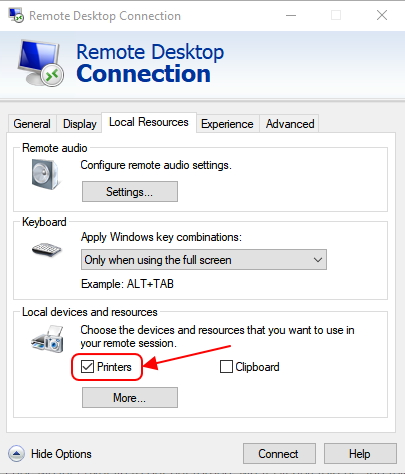
- Make sure you have selected to use the local Printer as a resource. You should have a checkmark next to the work “Printers”.
2. Make sure your printer is using an IP as a port or connected via USB.
3. Uninstall the printer
4. Reinstall it using the Windows drop down list.
- ON THE REMOTE MACHINE. SELECT THESE:
- Control Panel
- Devices and Printers
- Add a printer
- The printer that I want isn’t listed
- Add a local printer or network printer with manual settings
- Create a new port: Standard TCP/IP Port
- Enter your printers IP address
- Uncheck the “Query the printer…” option
- (optional) Device Type: Generic (This question may not appear)
- Select the manufacturer and Model.
4. Repeat steps 3 and 4 (probably 3 won’t be an issue if the remote machine never had this printer in the first place. Why do this? This allows the remote computer to have a local copy of the same driver. For the port you may use a local port such as LPT1 since we’re only installing it to load the driver.
That should do it.